How to Automatically Create and Launch Lethe Simulations#
See also
All files used in this example are available in lethe/contrib/utilities under automatic_launch.
The main Python scripts of this tutorial are:
generate_cases_locally.pygenerate_cases_cluster.pylaunch_lethe_locally.pylaunch_lethe_cluster.py
See also
The example Ribbon Mixer Using a Single Rotating Reference Frame uses really similar automatic launch scripts.
Generate Automatically Multiple Cases#
Let us say that you are simulating a flow around a cylinder and you want to see how the inlet velocity impacts the force around the sphere. Lazy as we are, we want to automatically generate multiple copies of the cylinder case, but change the parameter file such that the inlet velocity is different for each case.
You will need all these files from the Flow around a Cylinder example:
cylinder.prmcylinder-structured.geocylinder-structured.msh
Here are the boundary conditions of the flow around the cylinder.
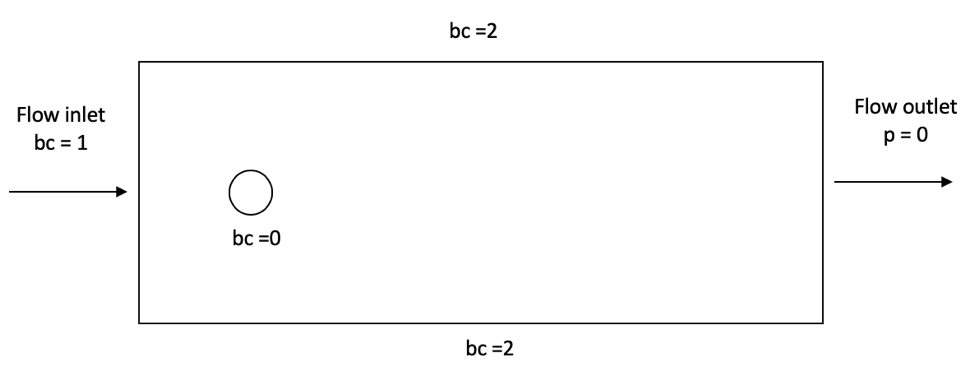
In the .prm file, we need to set bc = 1 as Function expression , which represents the velocity \(u\) in the \(x\) direction.
To do so, we use the Jinja2 Python package.
It allows us to create a parameter file template, where parameter variables in double brackets {{}}, can be replaced by any value we want.
The boundary conditions section in the .prm file becomes as follow.
subsection boundary conditions
  set number = 3
  subsection bc 0
    set type = noslip
  end
  subsection bc 1
    set type = function
    subsection u
      set Function expression = {{velocity_x}}
    end
    subsection v
      set Function expression = 0
    end
    subsection w
      set Function expression = 0
    end
  end
  subsection bc 2
    set type = slip
  end
end
Note
Note the {{velocity_x}} parameter variable is in Jinja2 format.
This will allow us to insert a specified value for the 2D around a cylinder case.
We will now present how to generate multiple folders, containing different parameters files, to ultimately launch them as separate cases. We can generate these folders locally and even on a Digital Alliance cluster.
Note
See the documentation about Running Lethe on Digital Research Alliance of Canada Clusters.
Locally#
Before importing the packages, we need to install them using pip and requirements.txt (available in the lethe-utils folder).
pip install -r requirements.txt
Then, we can import the right packages to launch the script.
from jinja2 import Template
import os
import numpy as np
import shutil
The first thing to do is set up the constants of the script.
PATH = os.getcwd()
CASE_PREFIX = 'cylinder_u_'
PRM_FILE = 'cylinder.prm'
MESH_FILE = 'cylinder-structured.msh'
PATHis the current path of the user directory where all cases’ folders will be placed.CASE_PREFIXwill specify how we want to name each folder.PRM_FILEis the name of the parameter file of the Lethe simulation.MESH_FILEis the name of the mesh used for the simulations.
Warning
The .msh file is not available as it is. You will need to run gmsh in order to generate the mesh around the cylinder from the .geo file.
See the documentation about gmsh here: Introduction on How to Use GMSH.
Then we specify the range of velocity we want to explore. In this example, we will generate 20 cases of the flow around a cylinder, where the inlet velocity varies from 1 to 10 \(m/s\).
number_of_cases = 20
first_velocity = 1
last_velocity = 10
velocity = np.linspace(1, 10, number_of_cases)
Now, the fun begins.
First, we create a Jinja2 template.
templateLoader = jinja2.FileSystemLoader(searchpath=PATH)
templateEnv = jinja2.Environment(loader=templateLoader)
template = templateEnv.get_template(PRM_FILE)
For each velocity in the range specified above,
for u in velocity:
we will:
Render the template with the right value.
parameters = template.render(velocity_x=u)
Warning
In the rendering step, it is really important to use the same variable name as the template file.
Then, we will need to copy in the case_path (the path of one case’s folder) all the files we need for the simulation.
Name the
case_pathand create it.
case_folder_name = f'{CASE_PREFIX}{u:.2f}'
case_path = f'{PATH}/{case_folder_name}'
os.mkdir(case_path)
Copy the
.prmfile and the.mshfile from the currentPATHto thecase_path.
shutil.copy(f'{PATH}/{PRM_FILE}', f'{case_path}/{PRM_FILE}')
shutil.copy(f'{PATH}/{MESH_FILE}', f'{case_path}/{MESH_FILE}')
Write the parameter file of the case with the rendered template.
with open(f'{case_path}/{PRM_FILE}', 'w') as f:
        f.write(parameters)
And voilà! The final current directory should look like this:
+---automatic_launch
|   +---cylinder_u_1.00
|   |       cylinder-structured.msh
|   |       cylinder.prm
|   |
|   +---cylinder_u_1.95
|   |       cylinder-structured.msh
|   |       cylinder.prm
|   |
|   +---cylinder_u_2.42
|   |       cylinder-structured.msh
|   |       cylinder.prm
|   |
|   \---cylinder_u_10.00
|   |       cylinder-structured.msh
|   |       cylinder.prm
Hint
Verify that the cylinder.prm files in each folder have a different boundary condition at bc = 1. This means that the Jinja2 script worked perfectly fine.
On Digital Alliance of Canada clusters#
If you want to generate different cases of a 2D flow around a cylinder, but on a cluster, the same script applies, with minor differences.
Before launching the script, we strongly suggest you to create a virtual environment. It is much easier to download the packages that you need.
Load the python module on the cluster.
module load python/3.X
Create the virtual environment.
virtualenv --no-download ENV
Activate the virtual environment.
source ENV/bin/activate
Note
The tag (ENV) should appear before the command prompt, meaning that you are in your virtual environment.
Install the requirements of the script.
pip install -r requirements.txt
To leave the virtual environment, just deactivate it with the command deactivate.
You can now launch the script on the cluster. Be sure to activate your virtual environment and change these lines of code that are specific to the cluster:
Specify the shell script that will launch a job on the cluster.
SHELL_FILE = 'launch_lethe.sh'
Copy the
.shfrom the currentPATHto thecase_path.
shutil.copy(f'{PATH}/{SHELL_FILE}', f'{case_path}/{SHELL_FILE}')
This last step allows to launch one job script for each case.
The launch_lethe.sh is the job script that sends the simulation to the cluster scheduler.
If you have multiple cases to launch on the cluster (let’s say 100 thousand), it is not a good idea to launch a really heavy Python script on the cluster. If you do this, a crying baby panda will appear and hunt you. To do so, it is recommended to create another job script that launches the automatic generator itself.
The automatic generator script is named launch_cases.py. Here is an example of how to make the job script:
#!/bin/bash
#SBATCH --time=02:00:00
#SBATCH --account=$yourgroupaccount
#SBATCH --ntasks=1
#SBATCH --mem-per-cpu=32G
#SBATCH --mail-type=FAIL
#SBATCH --mail-user=$your.email.address@email.provider
#SBATCH --output=%x-%j.out

source $SCRATCH/ENV/bin/activate
srun python3 launch_cases.py
Note
Note that we activate the virtual environment in order to have the packages required, and then we launch the Python script with srun.
Launch Automatically Multiple Cases#
Now that the folders of every case are all set up, we can launch Lethe automatically.
Both Python scripts to launch Lethe locally and on the cluster are simple and are presented below.
Locally#
Launching locally will simulate one case at a time.
Here is the script:
Set up the constants of the script.
PATH = os.getcwd()
PRM_FILE = 'cylinder.prm'
LETHE_EXEC = 'lethe-fluid'
Warning
Here, we suppose that the executable lethe-fluid is available directly in the PATH where all cases’ folders are present.
If your Lethe executable is elsewhere, just change the path to the right destination.
Enter each case’s folder and execute Lethe.
for root, directories, files in os.walk(PATH):
        if PRM_FILE in files and root != PATH:
                os.chdir(root)
                os.system(f'{LETHE_EXEC} {PRM_FILE}')
Note
If you want to run each simulation with more than one core, change the last line for os.system(f'mpirun -np $n {LETHE_EXEC} {PRM_FILE}'), with n being the number of CPU cores.
On Digital Alliance of Canada clusters#
The same script applies for launching all cases on a cluster. The advantage is that we send jobs to the scheduler, meaning that we can run multiple simulations at a time, instead of doing it one after the other. The only difference is the command line to launch the job script.
Add these steps to your code:
Specify the shell script that will launch a job on the cluster.
SHELL_FILE = 'launch_lethe.sh'
Instead of launching the Lethe executable, launch a job using the
sbatchcommand.
case_name = root.split('/')[-1]
os.system(f'sbatch -J {case_name} {SHELL_FILE}')
And you are done!